![]()
1 to 1 aiming:
1 to 1 aiming will be used for all thick shots. After figuring out that a shot is a thick shot, you will number the quadrants 1 to 4 as detailed above in chapter 6 “Quadrants” (shown in Fig 6) either from left to write (if the pocket is on left of a virtual line passing between the object ball and the cue ball as shown in Fig 6, Situation A) or right to left (if the pocket is on right of a virtual line passing between the object ball and the cue ball as shown in Fig 6, Situation B).
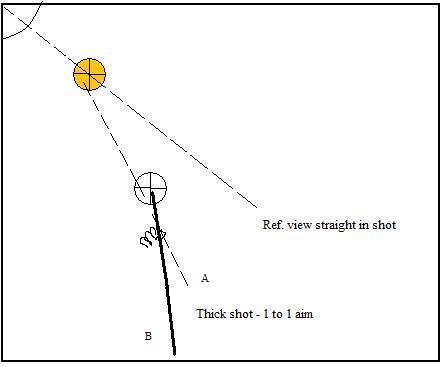
Fig. 7
You will line up your aim (a
virtual line) from the quadrant 1 of the cue ball to the quadrant 1 of
the object ball. After
the line up, you will not move your bridge hand at all. You will move the
cue stick’s tip to the center of the cue ball. This last line up
will be your shot line up. Using a smooth
stroke, you will pocket the object ball in the pocket. Please look Fig 7
above for a view.
Dashed line A is the first step of lining your shot as 1 to 1. Make sure to line up properly and after finding the proper line up don’t move your bridge hand at all. At this point all you have to do is move your cue stick's tip only. Move the cue stick’s tip to the center of the cue ball as shown by solid thick line B. Take 2 or 3 practice strokes and shoot smoothly straight.
Similarly, we replicate the method for the Situation B where the pocket is on right to our aim. Practice for both situations for thick shots. Practice for different distances for different thick shots.
I have prepared a video to explain further hope it will help but sorry for a poor quality as I am not a good cameraman.